Recently it came up that the previous tenant of my apartment still had keys to
the mailbox after almost a year since he moved out.
This left me wondering what else he still has access to.
Since I was then soon leaving for vacation, in addition to replacing all the
lock inserts I wanted to set up an ad hoc video surveillance system for the time
of my absence.
I had no time to wait for delivery, and it was supposed to be a one-time thing,
so my first requirement was: (1) it should use only the hardware I already had.
I wanted to have access to the recordings even if there was an incident and the
local hardware was destroyed, so the next requirement was: (2) it should record
straight to a remote server.
I wanted to be able to check on the apartment while I’m on vacation, so the
third requirement was: (3) it should provide a live video feed accessible from
my Android phone.
In case something did happen I wanted to have access to the recordings, so the
last requirement was: (4) it should provide remote access to video recordings
from my phone.
Hardware
My solution to requirement (1) was to use a laptop with a built-in webcam,
connect a Logitech C270 USB webcam I had lying around and point it in the
direction opposite to the built-in camera.
The C270 has a convenient mount that allowed me to install it directly on the
laptop’s open lid.
I placed the laptop in a good spot so that I could see the most critical spots
like the main and patio doors through one camera or the other.
The only thing left to do was to connect a charger and a network cable for
improved reliability.
Stream publishing
As for requirements (2) and (3), I settled for OBS Studio and
nginx-mod-rtmp over WireGuard.
After a rough internet search RTMP seemed like a stable and battle-tested
streaming protocol.
Also, the NGINX RTMP module was a convenient choice because it is available in the
Alpine Linux package depositories and I already had NGINX running on the server.
I used the following configuration:
rtmp {
	server {

        # Listen on a WireGuard interface
		listen 10.0.0.5:1935;

		application security {

            # Allow stream publishing and playing only from VPN
			allow publish 10.0.0.0/24;
			deny publish all;
			allow play 10.0.0.0/24;
			deny play all;

            # Enable live mode
			live on;

            # Fix mpv video player only playing audio
			wait_video on;

            # Record stream to files in 15-min chunks.
			record all;
			record_path /media/volume/security/;
			record_suffix -%Y-%m-%d-%H-%M-%S.flv;
			record_unique on;
			record_interval 15m;
		}
	}
}
On my laptop, I then created a scene in OBS Studio that contained feeds from
both cameras.
To publish the stream I went to Settings -> Stream, selected a custom service
and entered rtmp://10.0.0.5/security in the Server field.
The stream key can be an arbitrary string, but the same string is later used
for live playback.
Stream playing
I tested the live feed on my PC by running
mpv 'rtmp://10.0.0.5/security/streamkey'
where streamkey was the stream key configured in OBS Studio.
It worked fine, so I proceeded to viewing it on my Android phone.
The phone was already connected to the WireGuard network by
WireGuard for Android, so to play the stream I just had to open the above
URL in a video player that supports RTMP.
At first, I tried mpv, but it had issues with displaying frames before the
first received keyframe.
My second choice, VLC, worked well.
Access to recordings
Samba was my solution to requirement (4).
With the following config I enabled access to the directory with recordings.
[security]
	path = /media/volume/security/
On the Android side my tried-and-true solution for accessing Samba shares
is CIFS Documents Provider.
OBS Time Source
While playing the live stream I noticed that it was lacking something.
The video feed of home security cameras is mostly static, so it’s difficult to
perceive issues.
To solve this I wanted to add an overlay that displays current date and time,
so I can see the seconds change.
OBS Studio doesn’t have the ability to do that out of the box.
To my astonishment, the go-to solution for this seems to be a JavaScript
program running in the OBS’s built-in browser source.
That’s an awful lot of complexity literally just to render a clock.
After a bit of research I concluded that writing a date and time renderer for
OBS Studio cannot be that hard.
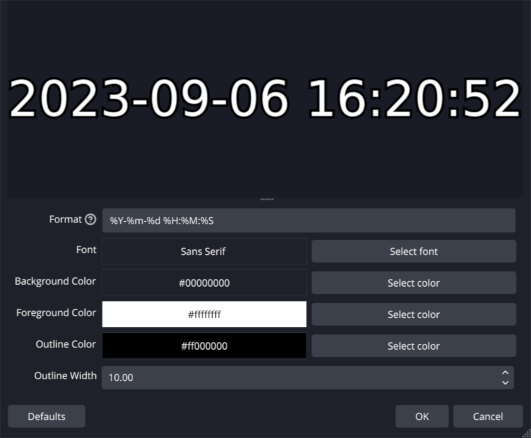
This is how OBS Time Source was created.
It’s a plugin that provides a new source that you can add to a scene to show
current date and time.
The format, font and color and outline can be configured in the source’s
properties.

Screenshot of OBS Time Source properties in OBS Studio
Misc
The last task was to make sure the inside of the apartment is clearly visible
during both day and night.
For this purpose, I set up two 7 Watt LED lights to light the areas visible
on the camera feeds.
Setting the webcams’ frame rates to 10 FPS also helped to achieve a better
exposition.
I tested the setup by closing all the blinds to simulate nighttime.
After some tweaking of the position and orientation of the lights, the video was
exposed well.
To mitigate possible OBS crashes I ran it in a loop with the --startstreaming
flag so that it restarts if it exits.
I used the following shell command.
while true; do obs --startstreaming; sleep 1; done
Summary
This setup has worked well for the whole 14 days I was away.
I successfully checked the live feed a couple of times and after coming back, I
verified that the entire stream was correctly recorded.
If you need a way to monitor your home for a short period of time, consider
replicating this setup.
If you do, please send me an email and tell me how it went.